
제목 그대로 실시간 Youtube 댓글과 날씨정보를 가져와 OLED에 뿌리는 프로젝트를 진행해보겠다.
하드웨어 먼저 소개하도록 하겠다.
먼저 몸체가 되는 Raspberry Pi Pico 보드이다.
Buy a Raspberry Pi Pico – Raspberry Pi
The Raspberry Pi Pico series is a range of tiny, fast, and versatile boards built using RP2040, the flagship microcontroller chip designed by Raspberry Pi in the UK
www.raspberrypi.com
콤팩트하게 설계하고 싶어서 선택했다. (비교적 간단하기도 하다.)
통신은 Ethernet으로 진행했는데, 직접 만들었던 W5100S + PoE 보드로 하도록 하겠다. 궁금하시면 아래링크 참고!
PoE Module 제작기[2]
Mode A, B 별로 각각 Aging 을 걸어 약 7-8W 까지는 정상적으로 동작하는 것을 확인했다. 자세한 내용은 아래 링크에 있다. What is PoE? My tough PoE development process Do you know about PoE? It's a tremendous technology tha
uiadu.tistory.com
OLED는 아주 작고 저렴한 SPI를 이용하는 SSD1306 OLED 를 이용했다.

다 연결을 하면 이렇게 작고 간단하게 구성이된다.

시작
이제 하드웨어 연결은 다 됐으니 소프트웨어 설계를 시작해보도록 하겠다.
Oled 에 날씨정보를 띄우고 싶다. 그리고 내가 올린 유투브에 새로운 댓글이 생기면 그 댓글을 10초간 Oled에 띄워주고 싶다. 이런 디바이스가 있다면, 컴퓨터 앞에 놓고 사용한다면 굉장히 재밌고 유용할 것이다.
간한단 블록도는 아래를 참고하시면 좋을 듯 하다.
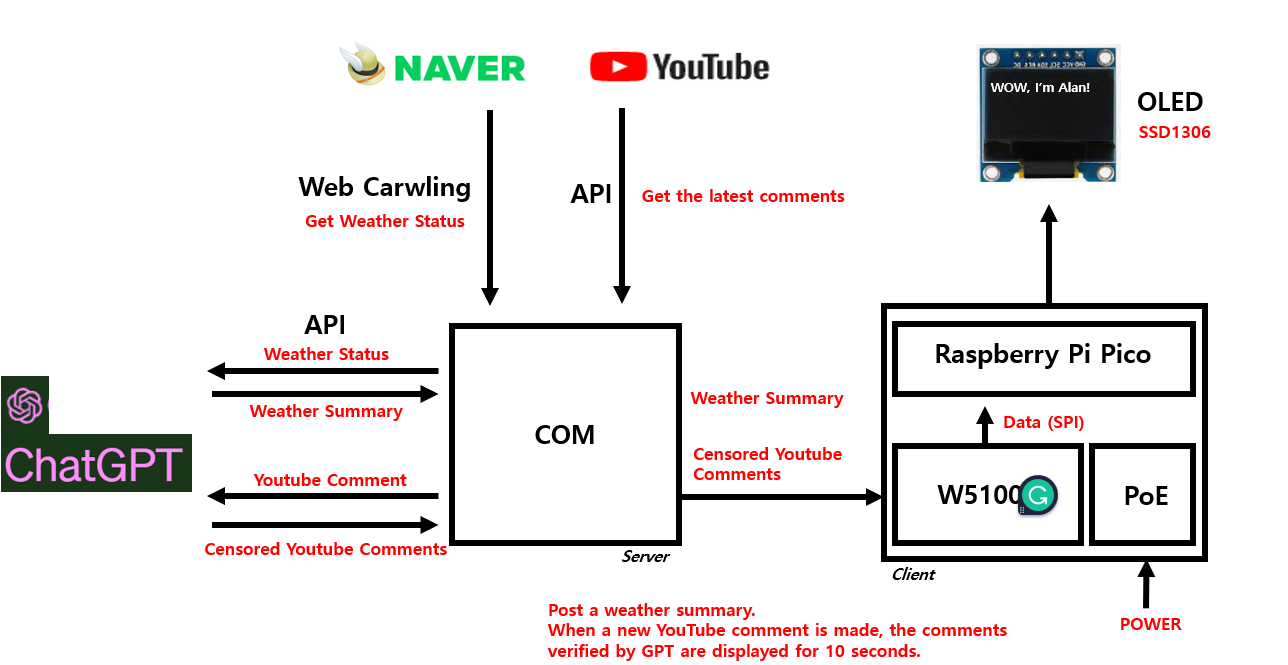
Web Crawling
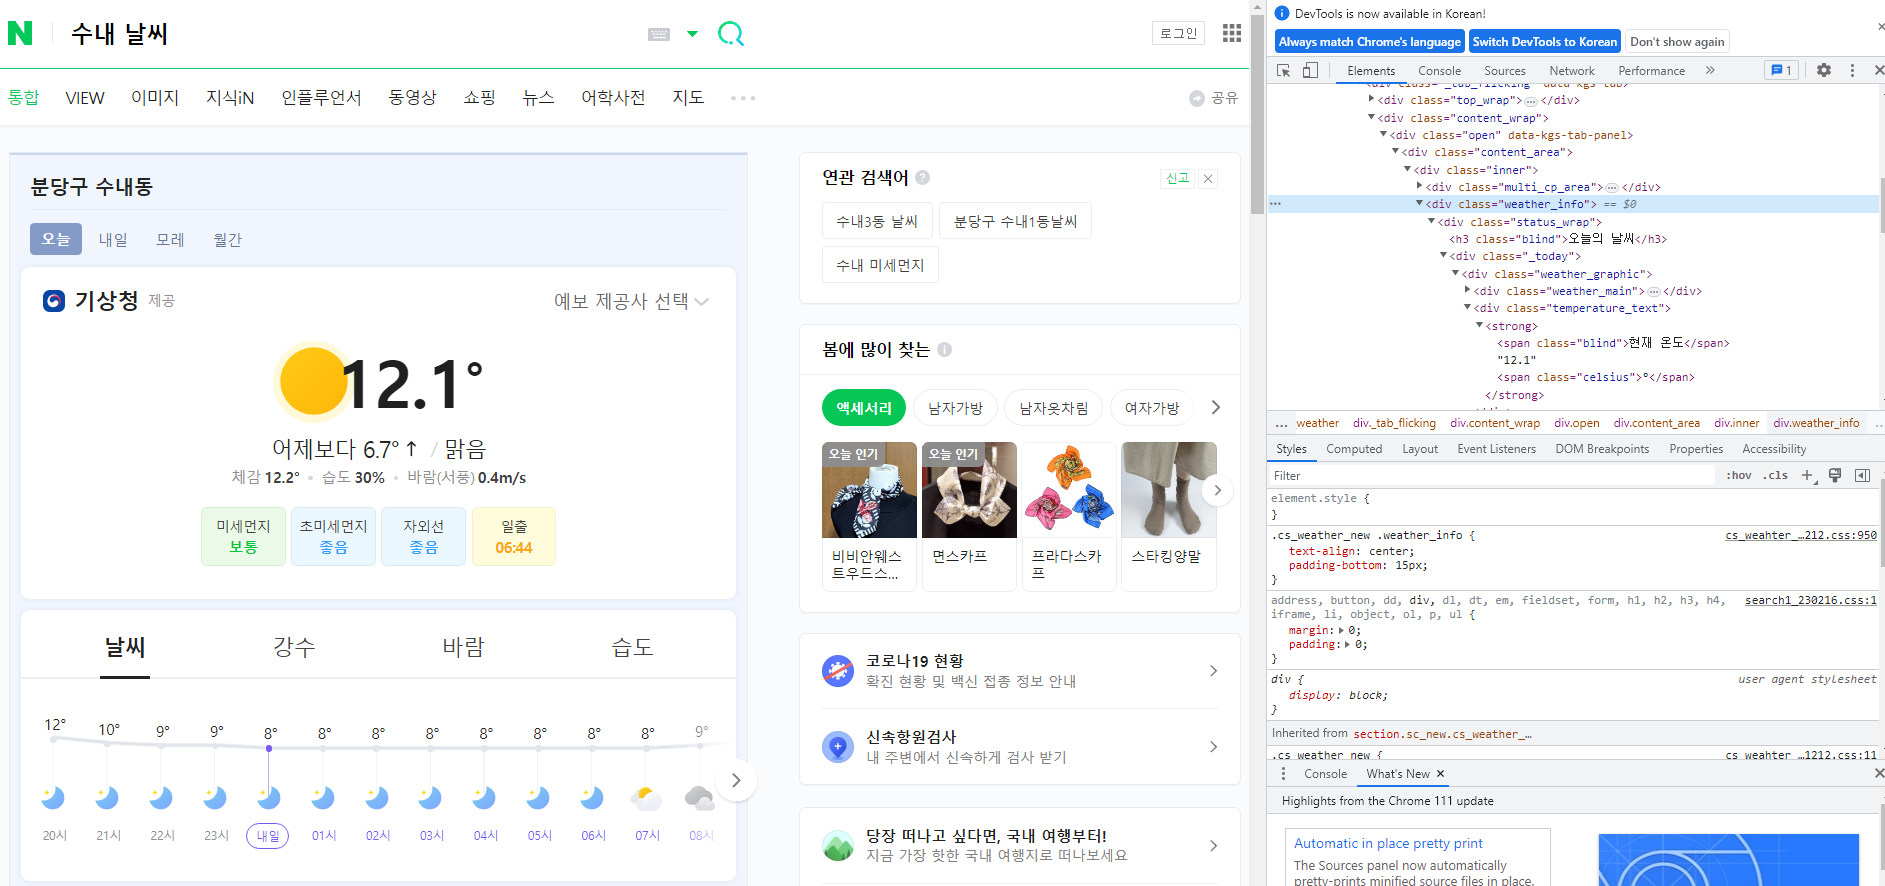
먼저 날씨 정보인데, 그냥 날씨 정보가 아닌 기상캐스터가 말해주는 것처럼 재밌게 글로 읽고싶다. 그래서 GPT API를 사용해 읽어오기로 했다. GPT는 현재 실시간 데이터서비스는 지원을 안한다. 그래서 Naver 에서 WebCrawling으로 읽어오기로 했다.
비교적 가볍고 구현이 간편한 Python 환경에서 구현을 시작했다.
from bs4 import BeautifulSoupdef getweather() :
html = requests.get('http://search.naver.com/search.naver?query=수내+날씨')
soup = BeautifulSoup(html.text, 'html.parser')
global weather
weather = ''
address = "Bundang Sunae"
weather += address + '*'
weather_data = soup.find('div', {'class': 'weather_info'})
# Current Temperature
temperature = (str(weather_data.find('div', {'class': 'temperature_text'}).text.strip()[5:])[:-1])
weather += temperature + '*'
# Weather Status
weatherStatus = weather_data.find('span', {'class': 'weather before_slash'}).text
if weatherStatus == '맑음':
weatherPrint = 'Sunny'
elif '흐림':
weatherPrint = 'Cloud'
weather += weatherPrintBeautifulSoup 이라는 패키지로 간단히 WebCrawling을 할 수 있다.
간단히 Crawling을 다뤄보자면

스크립트에서 temperature는 temperature_text에서 읽어왔다.

그리고 weather는 weather before_slash 의 span class 에서 읽어왔다.

영어로 읽어오고 싶은데 못찾겠어서 우선은 단순히 하드코딩했다...
그리고 동작을 시켜보면

이렇게 온도와 날씨를 출력해준다.
Youtube API
다음은 Youtube API를 이용해 최신 댓글을 읽어오도록 하겠다.
import pandas  # For Data
from googleapiclient.discovery import build  # For Google-API
패키지는 googleapiclient .discovery 패키지를 가져오면 되고, Pandas 패키지는 댓글 데이터를 가져오기 위한 패키지이다.
데이터를 주고받을때 Pandas 는 필수적인 패키지이다
def getYoutubecomments(youtubeID) :
    comments = list()
    api_obj = build('youtube', 'v3', developerKey='Youtube_Key')
    response = api_obj.commentThreads().list(part='snippet,replies', videoId=youtubeID, maxResults=100).execute()
    global df
    while response:
        for item in response['items']:
            comment = item['snippet']['topLevelComment']['snippet']
            comments.append(
                [comment['textDisplay'], comment['authorDisplayName'], comment['publishedAt'], comment['likeCount']])

            if item['snippet']['totalReplyCount'] > 0:
                for reply_item in item['replies']['comments']:
                    reply = reply_item['snippet']
                    comments.append(
                        [reply['textDisplay'], reply['authorDisplayName'], reply['publishedAt'], reply['likeCount']])

        if 'nextPageToken' in response:
            response = api_obj.commentThreads().list(part='snippet,replies', videoId=youtubeID,
                                                     pageToken=response['nextPageToken'], maxResults=1).execute()
        else:
            break
진행하기 앞서 Youtube 댓글을 가져오려면 Youtube API Key 가 필요하다. 이는 고유의 키로써 개인이 각각 발급받아야한다. 아래의 링크를 참고하여 발급받았다.
시작하기 | YouTube Data API | Google Developers
시작하기 컬렉션을 사용해 정리하기 내 환경설정을 기준으로 콘텐츠를 저장하고 분류하세요. 소개 이 문서는 YouTube와 상호작용할 수 있는 애플리케이션을 개발하려는 개발자를 위해 작성되었
developers.google.com
발급이 완료돼서 'Youtube_Key' 에 API Key를 넣어줬다. 그리고 원하는 유투브 영상의 ID를 입력해줬다.
youtubeID = 'et1o0K53O4Y'유투브 ID 는 해당 영상의 주소 맨 뒷부분에 위치한다.


동작시켜보면 잘 뜨는 것을 확인할 수 있다.
W5100S Ethernet Connection
Chat GPT에서 살짝 다듬기 전에 Ethernet 통신을 통해 데이터를 디바이스로 보내보도록 하겠다.
GitHub - Wiznet/RP2040-HAT-MicroPython
Contribute to Wiznet/RP2040-HAT-MicroPython development by creating an account on GitHub.
github.com
Pico의 MCU인 RP2040에서 Wiznet Ethernet Chip을 사용하는 라이브러리는 위의 링크에 있다.
이 라이브러리를 통해 간단하게 Pico에 W5100S를 붙여 사용할 수 있다.
SSD1306 OLED Display
from usocket import socket
from machine import Pin, SPI
import network
import time
from machine import Pin, I2C, UART, ADC
from ssd1306 import SSD1306_I2C

logo = [
    0x0f, 0x80, 0x7c, 0x00, 0x78, 0x61, 0x87, 0x80, 0x40, 0x12, 0x00, 0x80, 0x42, 0x0c, 0x00, 0x80,
    0x41, 0x84, 0x30, 0x80, 0x20, 0x44, 0xc1, 0x00, 0x20, 0x25, 0x01, 0x00, 0x10, 0x1e, 0x02, 0x00,
    0x0c, 0x3f, 0x8c, 0x00, 0x07, 0xe1, 0xf8, 0x00, 0x08, 0x00, 0x04, 0x00, 0x10, 0xc0, 0x42, 0x00,
    0x11, 0xe1, 0xf2, 0x00, 0x37, 0x1e, 0x1b, 0x00, 0x3c, 0x0c, 0x0f, 0x00, 0x68, 0x04, 0x05, 0x80,
    0xc8, 0x04, 0x04, 0x80, 0x88, 0x0c, 0x04, 0x40, 0x88, 0x1e, 0x04, 0x40, 0x8c, 0x1f, 0x0c, 0x40,
    0xdf, 0xe0, 0xfe, 0xc0, 0x7f, 0xc0, 0x73, 0x80, 0x61, 0x80, 0x61, 0x80, 0x21, 0x80, 0x41, 0x00,
    0x20, 0x80, 0x41, 0x00, 0x30, 0xc0, 0x83, 0x00, 0x10, 0xff, 0x82, 0x00, 0x0c, 0xff, 0xcc, 0x00,
    0x03, 0x80, 0x70, 0x00, 0x01, 0x80, 0x60, 0x00, 0x00, 0x61, 0x80, 0x00, 0x00, 0x1e, 0x00, 0x00]

# init I2C #
i2c = I2C(0, sda=Pin(0), scl=Pin(1), freq=400000)
oled = SSD1306_I2C(128, 64, i2c)


# W5x00 chip init
def w5x00_init():
    spi = SPI(0, 2_000_000, mosi=Pin(19), miso=Pin(16), sck=Pin(18))
    nic = network.WIZNET5K(spi, Pin(17), Pin(20))  # spi,cs,reset pin
    nic.active(True)

    # None DHCP
    nic.ifconfig(('192.168.0.20', '255.255.255.0', '192.168.0.1', '8.8.8.8'))

    # DHCP
    # nic.ifconfig('dhcp')

    print('IP address :', nic.ifconfig())
    while not nic.isconnected():
        time.sleep(1)
        print(nic.regs())


def client_loop():
    s = socket()
    s.connect(('192.168.0.8', 5000))  # Destination IP Address

    print("Client Connect!")
    while True:

        data = s.recv(2048)

        oled.fill(0)
        oled.show()
        if data != 'NULL':
            s.send(data)
            # oled.text(data, 0, 0)

            if data[0] == 45:
                oled.text(data[1:15], 0, 0)
                oled.text(data[15:30], 0, 10)
                oled.text(data[30:45], 0, 20)
                oled.text(data[45:60], 0, 30)
                oled.text(data[60:75], 0, 40)
                oled.text(data[75:90], 0, 50)


            else:
                weather = (data.decode('utf-8').split("*"))

                oled.text(weather[0], 0, 0)
                oled.text(weather[1], 0, 10)
                oled.text(weather[2], 0, 20)

            oled.show()
            time.sleep(1)


def main():
    w5x00_init()

    ###TCP CLIENT###
    client_loop()


if __name__ == "__main__":
    main()
Ethernet으로 데이터를 받는 코드와 OLED로 데이터를 주는 코드. 이렇게 작성됐다.
OLED는 SSD1306이란 패키지로 쉽게 구현이 가능했다.
그리고 서버에서 날씨 정보와 유투브 댓글을 보낼때, 서버에서는 둘을 구분하기 위해 유투브 댓글 앞에는 '-' 를 붙여서 보냈고, Client는 '-' 로 댓글과 날씨정보를 구분하여 OLED에 디스플레이 했다.
자 여기까지 일단 동작시켜봤다.
Com에서 날씨정보 얻고, Youtube 댓글 얻고 Server 생성 후 Ready --> Pico에 PoE로 연결즉시 Client가 Sever에 접속 --> Server에서 데이터 전송 --> Client에서 데이터 받아 OLED로 Display
위 동영상과 같이 동작된다. 중간에 Youtube 댓글을 달면 약 20~30 초 후 반영된다.
이제 마지막이다. Chat GPT로 변환시켜 데이터를 가져올 것이다.
Chat GPT 3.5 API 가 얼마전에 공식적으로 출시되서, 편하게 구현가능하다.
Chat GPT도 Youtube 때와 마찬가지로 API Key가 필요하다.
How to get API Key of GPT-3
Contributor: Arslan Tariq
www.educative.io
해당 링크의 포스팅을 통해 API Key를 받을 수 있었다.
자 이제 API Key를 받았으니 코드작성을 이어가보도록 하겠다.
import openaiChat GPT 는 이 openai 라는 패키지 하나만 있으면 뚝딱이다
def Chat_GPT_Comments(api_key, query):
    global answer

    openai.api_key = api_key

    model = "gpt-3.5-turbo"

    messages = [
        {
            "role": "system",
            "content": "You are a machine that gently changes negative or bad writing.."
        },
        {
            "role": "user",
            "content": query
        }
    ]

    response = openai.ChatCompletion.create(
        model=model,
        messages=messages
    )
    answer = response['choices'][0]['message']['content']
def Chat_GPT_Weather(api_key, query):
global answer
openai.api_key = api_key
model = "gpt-3.5-turbo"
messages = [
{
"role": "system",
"content": "You are a weather forecaster who sums up weather conditions well.."
},
{
"role": "user",
"content": query
}
]
response = openai.ChatCompletion.create(
model=model,
messages=messages
)
answer = response['choices'][0]['message']['content']우선 함수로 이렇게 작성해봤다. 날씨 정보를 받아와 GPT에서 돌릴 함수와 Youtube 댓글을 가져와 GPT에서 돌릴 함수. 이렇게 두개를 작성했다. 입력 파라메타 하나 더 놓고 If 문 써서 더 간단하게 구현가능하지만 일단 귀찮았다.
일단 간단히 내부구조를 보면 openai.ChatCompletion.create 를 써서 model 과 massage 만 보내주면 끝이다.
GPT에게 역할을 정해주고 나는 명령을 내리기만 했다. 그리고 응답을 내가 원하는 방식으로 answer에 받아줬다.
while True:

    getweather()
    getYoutubecomments(youtubeID)

    if compareText == df[0][0]:
        query = "The current weather is very {} with {} degrees. Summarize this weather as the weatherman says. In one sentence, please.".format(weatherPrint, temperature)
        print(f"1:query={query}")
        Chat_GPT_Weather(api_key, query)
        print(f"1:answer={answer}")
        result = connectionSock.send(answer.encode('utf-8'))
        print(f"1:result={result}")

    else:
        if len(df[0][0]) > 30:
            query = "'{}' Please summarize the sentence in 60 letters or less than 60 letters.".format(df[0][0])
            print(f"2:query={query}")
            Chat_GPT_Comments(api_key, query)

            compareText = df[0][0]
            answer = '-' + answer
            connectionSock.send(answer.encode('utf-8'))
            print(f"2:answer={answer}")

        else:
            compareText = df[0][0]
            commentsprint = '-' + df[0][0]
            connectionSock.send(commentsprint.encode('utf-8'))
            print(f"2:commentsprint={commentsprint}")

    time.sleep(10)
그리고 메인문은 이렇게 작성했다.
계속해서 날씨 데이터를 받아오고 GPT에게 넘겨줘서 마치 기상캐스터가 말하는 것처럼 바꿔온다. 바꿔온 데이터를 Pico에게 넘겨주고, Pico는 OLED에 출력한다.
그리고 새로운 Youtube 댓글이 달리면 그 댓글을 GPT에게 넘겨줘서 만약 부정적인 말이 섞여있다면 조금 부드럽게 바꿔온다. 그리고 OLED에 60자 이상의 Text는 띄울수 없기에 60자가 넘는 댓글이 달리면 그 이하로 줄여서 받게된다. 그리고 Pico는 OLED에 출력한다.

동작을 Print해봤다.


처음에는 Youtube 댓글이 뜬다.

그리고 현재 온도와 날씨를 반영한 GPT에게 입력할 명령어가 뜬다.

그리고 GPT가 대답한 응답이 뜬다.
정상적으로 동작한다.
이렇게 프로젝트를 간단히 구성해봤다. OLED 가 작고 표현할 수 있는것이 없어서 너무 아쉬웠다.
다음엔 조금 큰 LCD로 멋지게 구현하면 더 좋은 프로젝트가 될 수 있을 것 같다.
'Wiznet' 카테고리의 다른 글
| The world's smallest oscilloscope (0) | 2023.07.05 |
|---|---|
| Choice! Check your fortune with tarot cards ! (0) | 2023.07.05 |
| Seeed Studio - Xiao RP2040 보드 호환 Ethernet 보드 제작기 (0) | 2023.06.20 |
| W5100S-EVB-Pico 로 Arduinon Ethernet 예제 돌려보기 (0) | 2022.11.05 |


